If you’ve ever opened a WordPress project and thought “What was this developer thinking?”, you’re not alone. I’ve spent years reviewing WordPress code, and I’ve learned that the difference between code that works and code that lasts comes down to following proven principles and standards.
Let me walk you through everything you need to know about writing clean, professional WordPress code, whether you’re building your first plugin or maintaining an enterprise-level theme.
Why Clean Code Actually Matters?
Picture this: You write a plugin today, and it works perfectly. Six months later, a colleague needs to add a feature. They open your code and… they can’t figure out where to start. Sound familiar?
Clean code isn’t about being fancy; it’s about respect. Respect for future developers (including yourself), respect for security, and respect for your user’s websites. When thousands of developers might touch a WordPress codebase over its lifetime, consistency becomes critical.
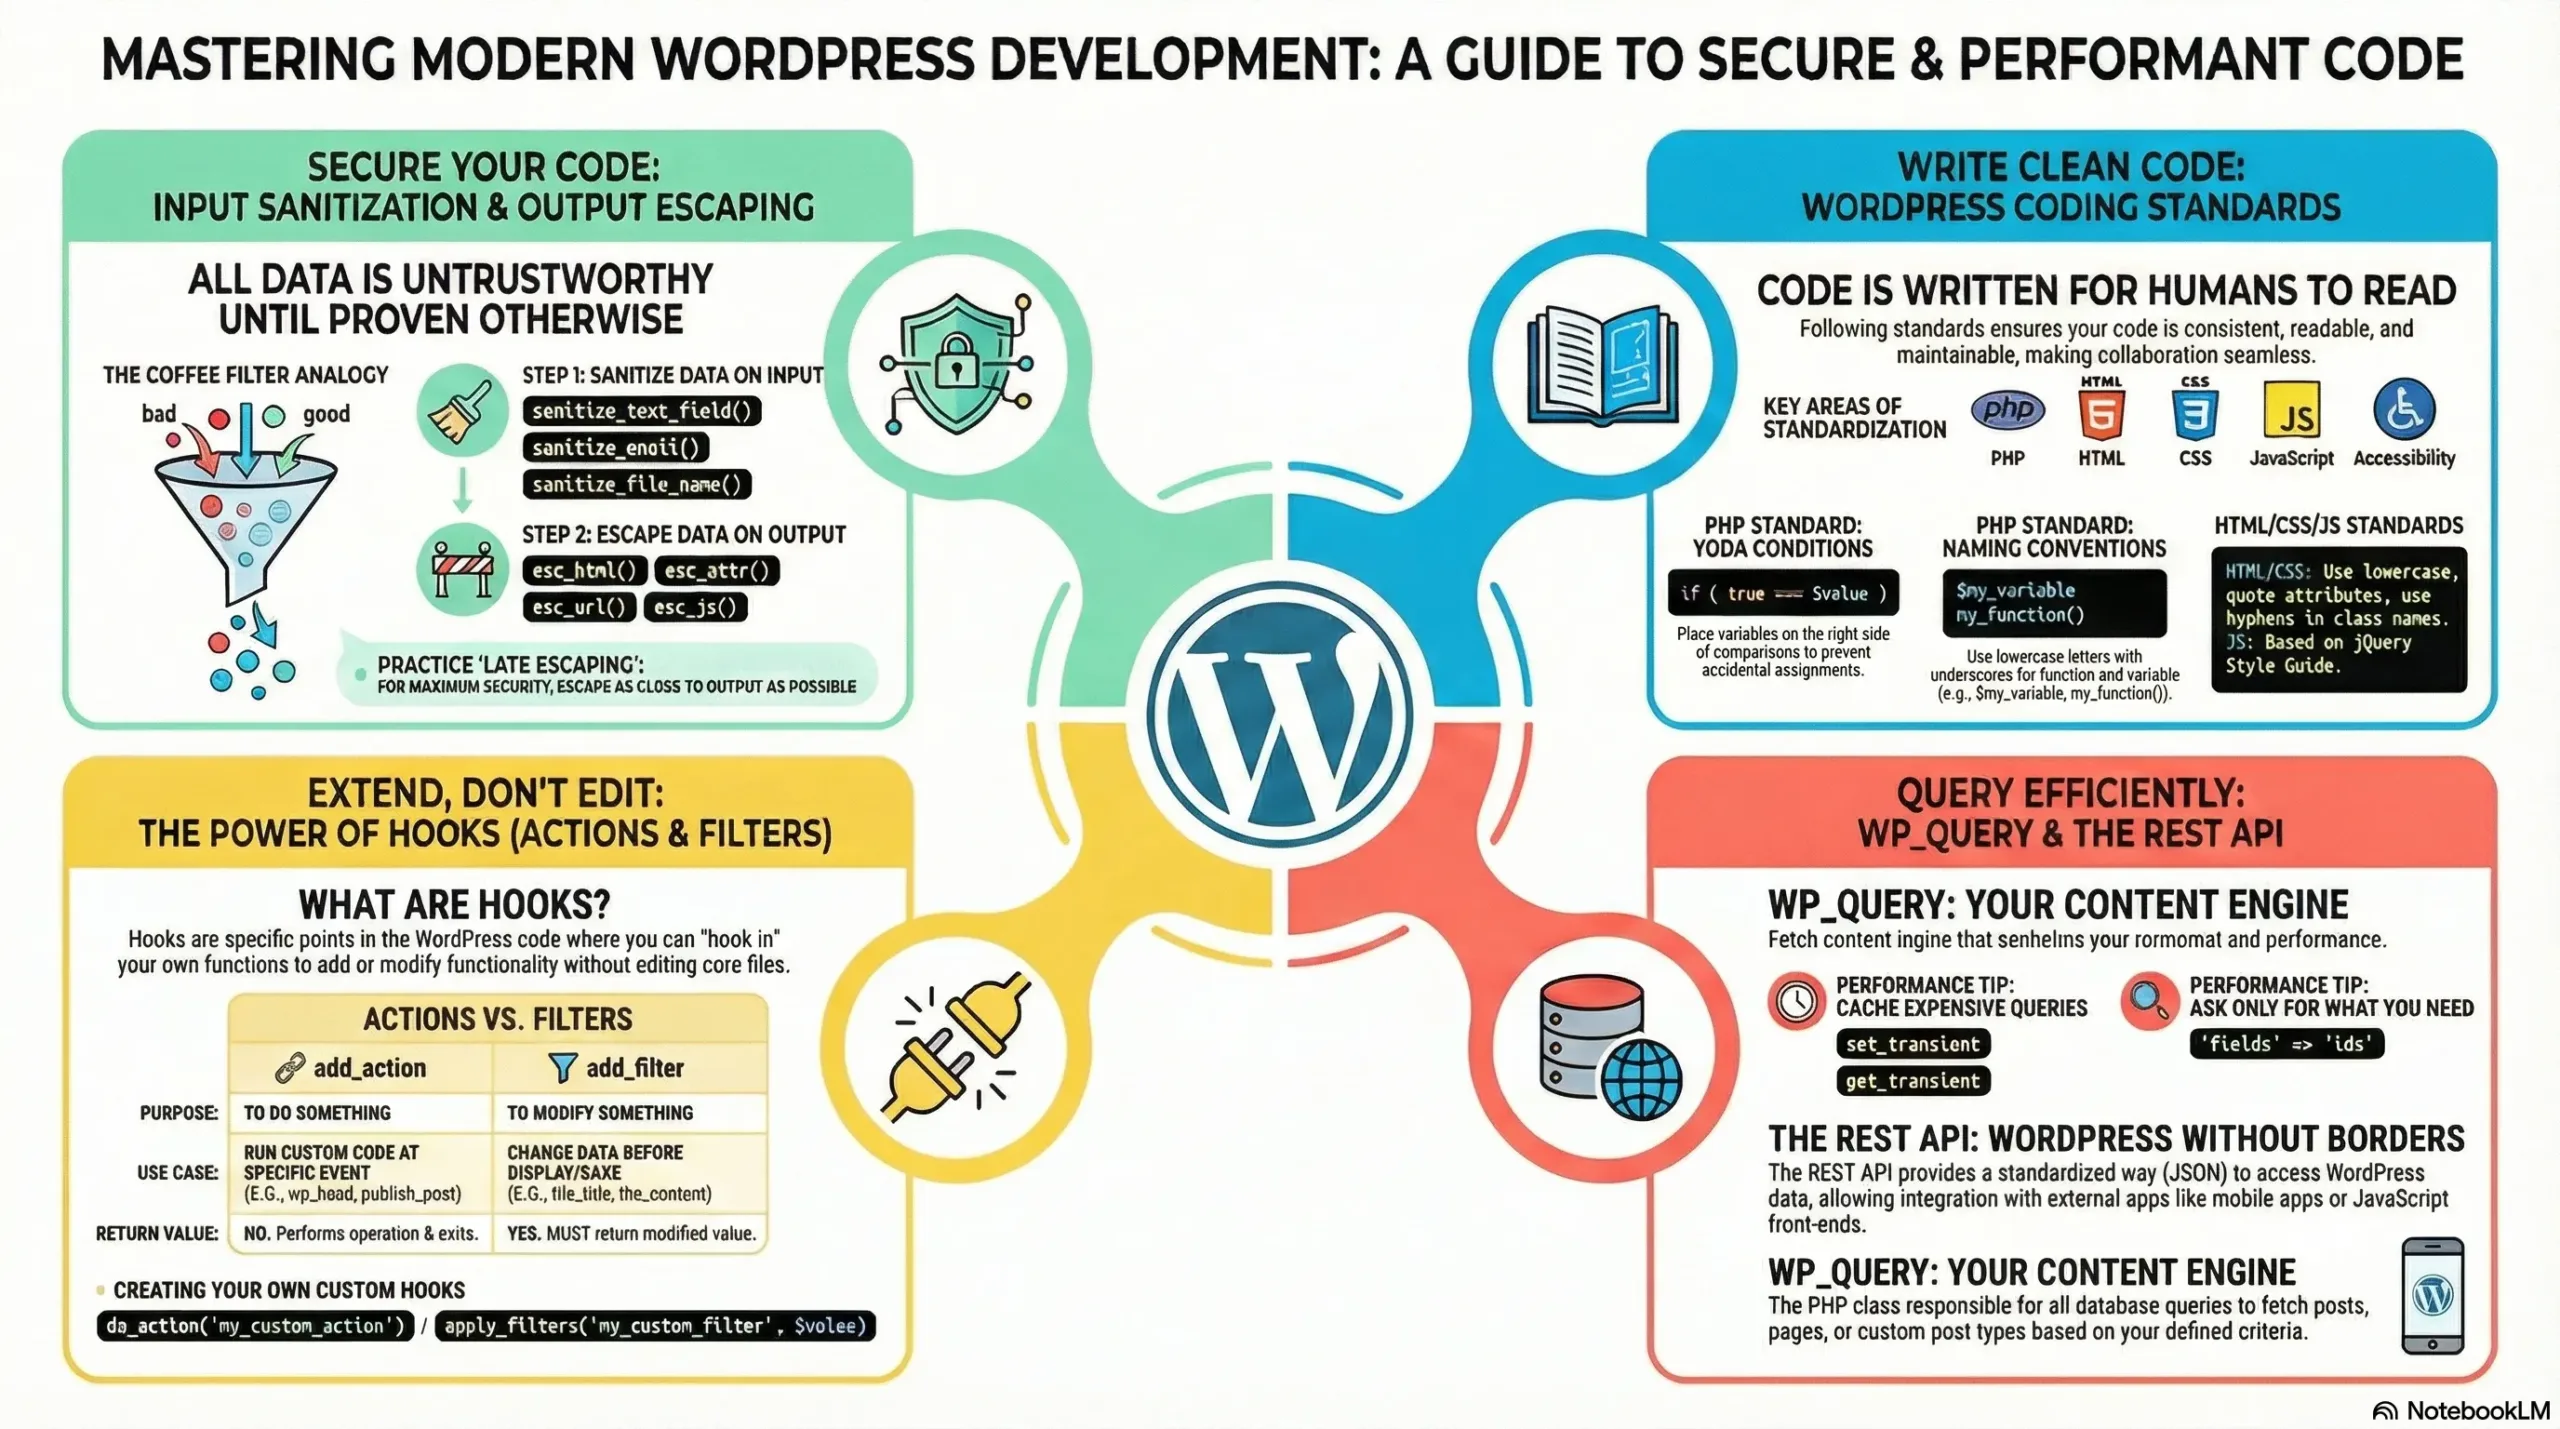
1. Follow WordPress Coding Standards (Your New Best Friend)
WordPress has official coding standards, and they exist for one simple reason: code should look like one person wrote it, even if a hundred people contributed.
PHP Formatting Basics
Use Real Tabs for Indentation
WordPress uses tabs, not spaces. Why? Because different developers can set their preferred tab width without messing up the code.
// Good
function my_function() {
	$variable = 'value';
	if ( $condition ) {
		do_something();
	}
}
Always Use Full PHP Tags
Never use shorthand tags like <?= because some servers don’t support them.
// Bad
<?= $variable ?>

// Good
<?php echo $variable; ?>
Use Braces for Everything
Even if you have a single-line statement, always use braces. This prevents bugs when you add more code later.
// Bad - easy to break
if ( $is_active ) do_something();

// Good - safe and clear
if ( $is_active ) {
	do_something();
}
Naming Conventions That Make Sense
WordPress uses different naming styles for different languages:
PHP: snake_case
$user_email = '[email protected]';
function get_user_data() { }
class User_Manager { }
JavaScript: camelCase
const userName = 'John';
function getUserData() { }
File Names
If a file contains a class, name it like this: class-user-manager.php
The “Yoda Conditions” Trick
This might look weird at first, but it’s a lifesaver. Put the constant or literal value on the LEFT side of comparisons:
// Good (Yoda style)
if ( true === $is_active ) {
	// code here
}

// Bad
if ( $is_active === true ) {
	// If you accidentally type = instead of ===,
	// you'll assign true to $is_active!
}
Why does this work? If you accidentally type = instead of ===, you’ll get an error instead of a silent bug:
if ( true = $is_active ) { // This causes an error - can't assign to a constant!2. The Security Trinity: Validate, Sanitize, Escape
Here’s a rule I live by: Trust no one. Not your users, not other plugins, not even data from your own database. Every piece of data that enters or leaves your code needs protection.
Step 1: Validate (Is This Even the Right Type of Data?)
Before doing anything with data, check if it’s what you expect.
Check User Intent with Nonces
Nonces prevent Cross-Site Request Forgery (CSRF) attacks. Think of them as one-time passwords for forms.
// When creating a form.
<input type="hidden" name="my_nonce" value="<?php echo wp_create_nonce( 'my_action' ); ?>">

// When processing the form.
if ( ! wp_verify_nonce( $_POST['my_nonce'], 'my_action' ) ) {
	wp_die( 'Security check failed' );
}
Check User Permissions
Just because someone is logged in doesn’t mean they should edit posts!
if ( ! current_user_can( 'edit_posts' ) ) {
	wp_die( 'You do not have permission to do this.' );
}
Step 2: Sanitize (Clean the Input)
Sanitization removes dangerous code BEFORE you save data to the database.
Think of it like washing vegetables before cooking – you’re removing the dirt before you use them.
// Sanitizing text input
$user_name = sanitize_text_field( $_POST['name'] );

// Sanitizing email
$user_email = sanitize_email( $_POST['email'] );

// Sanitizing integers (only positive numbers)
$post_id = absint( $_POST['post_id'] );

// Sanitizing URLs
$website = esc_url_raw( $_POST['website'] );
Step 3: Escape (Secure the Output)
Here’s where many developers mess up: they sanitize when saving but forget to escape when displaying. You need both!
Escaping makes data safe RIGHT before you output it to the browser. I call this “Late Escaping” – do it at the last possible moment.
// Good - escaped at the point of output
echo '<h1>' . esc_html( $page_title ) . '</h1>';
echo '<a href="' . esc_url( $link ) . '">' . esc_html( $text ) . '</a>';
echo '<input type="text" value="' . esc_attr( $value ) . '">';
Complete Example: Building a Safe Form
// Processing the form
if ( isset( $_POST['submit'] ) ) {
	// Validate nonce
	if ( ! wp_verify_nonce( $_POST['my_nonce'], 'save_settings' ) ) {
		wp_die( 'Security check failed' );
	}

	// Validate permission
	if ( ! current_user_can( 'manage_options' ) ) {
		wp_die( 'Insufficient permissions' );
	}

	// Sanitize input
	$site_title = sanitize_text_field( $_POST['site_title'] );

	// Save to database
	update_option( 'my_site_title', $site_title );
}

// Displaying the form
$saved_title = get_option( 'my_site_title', '' );
?>
<form method="post">
	<?php wp_nonce_field( 'save_settings', 'my_nonce' ); ?>
	<input type="text" name="site_title" value="<?php echo esc_attr( $saved_title ); ?>">
	<button type="submit" name="submit">Save</button>
</form>
3. Keep Your Code Organized: Namespaces and Autoloading
As your plugin grows, you’ll create more files and classes. Without organization, you’ll end up with naming conflicts.
The Problem with Global Namespace
Imagine you create a function called get_data(). Another plugin does the same. Boom—conflict! Your site crashes.
The Solution: Namespaces
Namespaces are like folders for your code. They prevent naming conflicts.
// In file: includes/class-data-loader.php
namespace MyCompany\MyPlugin;

class Data_Loader {
	public function get_data() {
		// Your code here
	}
}

// Using the class
use MyCompany\MyPlugin\Data_Loader;

$loader = new Data_Loader();
$data = $loader->get_data();
Stop Using require_once Everywhere
Instead of this mess:
require_once plugin_dir_path( __FILE__ ) . 'includes/class-data-loader.php';
require_once plugin_dir_path( __FILE__ ) . 'includes/class-user-manager.php';
require_once plugin_dir_path( __FILE__ ) . 'includes/class-settings.php';
// ... and 50 more files
Use Composer’s autoloader to automatically load classes when needed:
// In your main plugin file
require_once __DIR__ . '/vendor/autoload.php';

// That's it! Classes load automatically when you use them
$loader = new MyCompany\MyPlugin\Data_Loader();
4. Use Constants for Reusable Values
Here’s a scenario that happens all the time: You create a custom post type called product and use it in 15 different files across your plugin. Six months later, your client says “Actually, can we call it item instead?” Now you have to hunt through every single file to find and replace product. Miss one, and you’ve got bugs.
The solution? Use constants.
Why Constants Matter
Constants are like variables that never change. Once you define them, they stay the same throughout your entire codebase. This means:
- Single Source of Truth: Change the value in one place, and it updates everywhere
- No Typos:
MY_POST_TYPEis easier to spot than a typo in'producct' - Better Code Completion: Your IDE can autocomplete constant names
- Clear Intent: When someone sees a constant, they know it’s important and shouldn’t be changed randomly
Defining Constants the Right Way
In your main plugin file or a dedicated constants file:
<?php
namespace MyCompany\MyPlugin;

// Exit if accessed directly
if ( ! defined( 'ABSPATH' ) ) {
	exit;
}

/**
 * Define plugin constants
 */
class Constants {

	// Post Types
	const POST_TYPE_PRODUCT = 'product';
	const POST_TYPE_REVIEW = 'product_review';

	// Taxonomies
	const TAXONOMY_CATEGORY = 'product_category';
	const TAXONOMY_TAG = 'product_tag';

	// Meta Keys
	const META_PRICE = '_product_price';
	const META_SKU = '_product_sku';
	const META_STOCK = '_product_stock';

	// Options
	const OPTION_SETTINGS = 'my_plugin_settings';
	const OPTION_VERSION = 'my_plugin_version';

	// Nonce Actions
	const NONCE_SAVE_PRODUCT = 'save_product';
	const NONCE_DELETE_PRODUCT = 'delete_product';

	// User Capabilities
	const CAP_MANAGE_PRODUCTS = 'manage_products';
	const CAP_EDIT_PRODUCTS = 'edit_products';

	// Cache Keys
	const CACHE_PRODUCTS = 'my_plugin_products';
	const CACHE_DURATION = 3600; // 1 hour in seconds
}
Using Constants Across Your Plugin
Now you can use these constants everywhere:
Registering a Post Type:
<?php
namespace MyCompany\MyPlugin;

class Post_Types {

	public function register() {
		register_post_type( Constants::POST_TYPE_PRODUCT, [
			'labels' => [
				'name' => __( 'Products', 'my-plugin' ),
				'singular_name' => __( 'Product', 'my-plugin' ),
			],
			'public' => true,
			'has_archive' => true,
			'supports' => [ 'title', 'editor', 'thumbnail' ],
		]);
	}
}
Querying Posts:
<?php
namespace MyCompany\MyPlugin;

class Product_Query {

	public function get_products() {
		// Check cache first
		$products = get_transient( Constants::CACHE_PRODUCTS );

		if ( false === $products ) {
			$products = new \WP_Query([
				'post_type' => Constants::POST_TYPE_PRODUCT,
				'posts_per_page' => 10,
				'no_found_rows' => true,
			]);

			// Cache for 1 hour
			set_transient(
				Constants::CACHE_PRODUCTS,
				$products,
				Constants::CACHE_DURATION
			);
		}

		return $products;
	}
}
Saving Meta Data:
<?php
namespace MyCompany\MyPlugin;

class Product_Meta {

	public function save_product_data( $post_id ) {
		// Verify nonce
		if ( ! wp_verify_nonce( $_POST['nonce'], Constants::NONCE_SAVE_PRODUCT ) ) {
			return;
		}

		// Check capabilities
		if ( ! current_user_can( Constants::CAP_EDIT_PRODUCTS ) ) {
			return;
		}

		// Sanitize and save meta
		$price = sanitize_text_field( $_POST['price'] );
		$sku = sanitize_text_field( $_POST['sku'] );

		update_post_meta( $post_id, Constants::META_PRICE, $price );
		update_post_meta( $post_id, Constants::META_SKU, $sku );
	}
}
Checking Permissions:
<?php
namespace MyCompany\MyPlugin;

class Admin_Page {

	public function render() {
		// Check if user has permission
		if ( ! current_user_can( Constants::CAP_MANAGE_PRODUCTS ) ) {
			wp_die( __( 'You do not have permission to access this page.', 'my-plugin' ) );
		}

		// Display admin page
		$this->display_settings();
	}
}
Real-World Example: Easy Refactoring
Let’s say you need to rename your post type from product to shop_item. Without constants:
// You'd have to change this in 20+ files:
'post_type' => 'product'  // File 1
'post_type' => 'product'  // File 2
'post_type' => 'product'  // File 3
// ... and you'll probably miss some
With constants, you change it in ONE PLACE:
// In your Constants class - change once
const POST_TYPE_PRODUCT = 'shop_item';  // Done! Updates everywhere
Bonus: Using Constants for Version Numbers
This is especially useful for database migrations and cache busting:
class Constants {
	const VERSION = '1.2.0';
	const DB_VERSION = '1.1.0';
}

// Check if database needs updating
$current_db_version = get_option( 'my_plugin_db_version' );

if ( version_compare( $current_db_version, Constants::DB_VERSION, '<' ) ) {
	// Run database migration
	$this->update_database();
	update_option( 'my_plugin_db_version', Constants::DB_VERSION );
}
Constants vs. Configuration Arrays
For more complex configurations, you might want to use arrays instead:
class Config {

	public static function get_post_types() {
		return [
			'product' => [
				'slug' => 'product',
				'labels' => [
					'name' => __( 'Products', 'my-plugin' ),
					'singular_name' => __( 'Product', 'my-plugin' ),
				],
				'supports' => [ 'title', 'editor', 'thumbnail' ],
			],
			'review' => [
				'slug' => 'product_review',
				'labels' => [
					'name' => __( 'Reviews', 'my-plugin' ),
					'singular_name' => __( 'Review', 'my-plugin' ),
				],
				'supports' => [ 'title', 'editor' ],
			],
		];
	}
}
But for simple string values that you reference frequently (like post type slugs, meta keys, and option names), constants are cleaner and faster.
Constants Naming Convention
Follow these conventions for clarity:
// Use SCREAMING_SNAKE_CASE for constants
const POST_TYPE_PRODUCT = 'product';  // ✅ Good
const post_type_product = 'product';  // ❌ Bad

// Group related constants with prefixes
const POST_TYPE_PRODUCT = 'product';
const POST_TYPE_REVIEW = 'review';
const META_PRICE = '_price';
const META_SKU = '_sku';

// Make them descriptive
const CACHE_DURATION = 3600;           // ✅ Good
const CD = 3600;                       // ❌ Bad - unclear
By using constants strategically, you make your WordPress code easier to maintain, refactor, and debug. It’s a small habit that pays huge dividends as your plugin grows.
5. Write Fast Code: Database Query Optimization
Clean code is also fast code. Here’s how to avoid performance disasters.
Never Fetch “All Posts”
This is a common mistake that can crash your server:
// TERRIBLE - will crash on large sites
$query = new WP_Query([
	'post_type' => 'post',
	'posts_per_page' => -1, // DON'T DO THIS!
]);
Always set a reasonable limit:
// Good
$query = new WP_Query([
	'post_type' => 'post',
	'posts_per_page' => 10,
]);
Skip Row Counting When You Don’t Need It
By default, WordPress counts total results for pagination. If you’re just showing a list and don’t need page numbers, disable this:
$query = new WP_Query([
	'post_type' => 'post',
	'posts_per_page' => 5,
	'no_found_rows' => true, // Faster queries!
]);
Cache Expensive Operations with Transients
If you have a complex database query or an API call, don’t run it every single time someone loads the page. Cache it!
function get_popular_posts() {
	// Try to get cached data
	$posts = get_transient( 'popular_posts' );

	// If no cache exists, do the expensive work
	if ( false === $posts ) {
		$posts = new \WP_Query([
			'post_type' => 'post',
			'posts_per_page' => 10,
			'meta_key' => 'views',
			'orderby' => 'meta_value_num',
			'order' => 'DESC',
		]);

		// Cache for 1 hour
		set_transient( 'popular_posts', $posts, HOUR_IN_SECONDS );
	}

	return $posts;
}
6. Make Your Code Extensible: Hooks and Filters
Professional WordPress code doesn’t just work—it can be extended without editing core files.
Create Your Own Hooks
Actions let other developers inject code at specific points:
function send_welcome_email( $user_id ) {
	// Allow others to do something before sending
	do_action( 'before_welcome_email', $user_id );

	wp_mail( $email, $subject, $message );

	// Allow others to do something after sending
	do_action( 'after_welcome_email', $user_id );
}
Now other developers can add functionality:
add_action( 'after_welcome_email', function( $user_id ) {
	// Log this event
	error_log( "Welcome email sent to user $user_id" );
});
Filters let others modify your data:
function get_email_subject() {
	$subject = 'Welcome to Our Site';

	// Allow others to change the subject
	return apply_filters( 'my_plugin_email_subject', $subject );
}
Other developers can now customize it:
add_filter( 'my_plugin_email_subject', function( $subject ) {
	return 'Welcome Aboard! 🎉';
});
REST API Security
If you create custom REST API endpoints, always add permission checks:
// BAD - no security!
register_rest_route( 'myplugin/v1', '/data', [
	'methods' => 'GET',
	'callback' => 'get_secret_data',
]);

// GOOD - with permission check
register_rest_route( 'myplugin/v1', '/data', [
	'methods' => 'GET',
	'callback' => 'get_secret_data',
	'permission_callback' => function() {
		return current_user_can( 'edit_posts' );
	}
]);

// For truly public endpoints
register_rest_route( 'myplugin/v1', '/public', [
	'methods' => 'GET',
	'callback' => 'get_public_data',
	'permission_callback' => '__return_true', // Explicitly public
]);
7. Automate Quality Checks: Use the Right Tools
You don’t need to memorize every rule. Let tools do the heavy lifting.
PHP_CodeSniffer (PHPCS)
This tool automatically checks your code against WordPress standards.
Installation:
composer require --dev wp-coding-standards/wpcsUsage:
phpcs --standard=WordPress my-plugin.phpESLint for JavaScript:
Keep your JavaScript clean too:
npm install --save-dev @wordpress/eslint-pluginPHPUnit for Testing:
Write tests to ensure your code keeps working:
class TestMyPlugin extends WP_UnitTestCase {
	public function test_email_sending() {
		$result = send_welcome_email( 1 );
		$this->assertTrue( $result );
	}
}
Writing clean WordPress code isn’t about being perfect – it’s about being professional. It’s about building software that lasts, that others can maintain, and that keeps websites secure.
Start small. Pick one principle from this guide and apply it to your next project. Master it, then add another. Over time, these practices become second nature, and you’ll transition from someone who writes code that works to an engineer who writes code that endures.
Leave a Reply